How to Tile a Shower Wall or Tub Surround (Phoenix Homeowner Guide)
Step-by-step guide to tiling a shower wall or tub surround in a Phoenix home, with the rule behind every step: the right backer board, waterproofing, wet-saw silica safety, thinset coverage, grout, flexible corners and ventilation.
By Gabriel · Licensed Phoenix, Arizona General Contractor ROC 367058 (R-62) · 2026-11-02
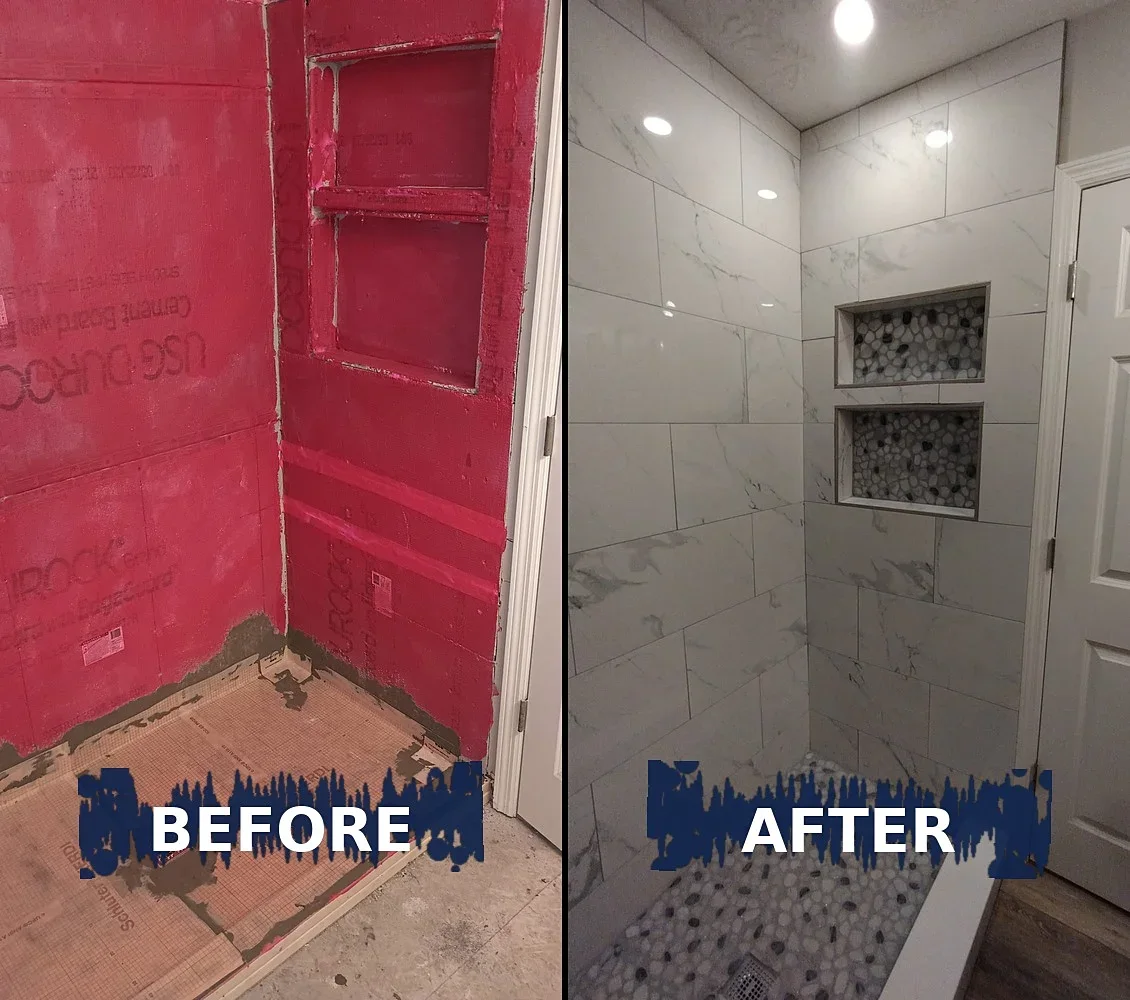
A tiled shower looks like a waterproof box, but tile and grout are not waterproof. Water soaks through grout every time you shower, so what really keeps the wall and the framing dry is the backer board and the waterproofing behind the tile. Most of the rotted studs, moldy drywall and loose tiles I tear out in Phoenix come from showers that were tiled over the wrong board or with no waterproofing at all.
Below is the order I follow when I tile a shower wall or a tub surround. Every step says why it matters and which rule is behind it: the 2024 International Residential Code (IRC), the 2023 National Electrical Code (NEC), the ANSI A108/A118 tile installation standards the IRC points to, the TCNA Handbook movement-joint guideline, or the OSHA silica rule for cutting tile and cement board.
Tools and parts
- Respirator (N95 minimum, half-face P100 better), safety glasses, hearing protection and gloves
- Wet tile saw (or a manual snap cutter for straight cuts) and a GFCI-protected outlet or GFCI cord
- Cement backer board (or another IRC-listed tile backer), backer-board screws, alkali-resistant mesh tape
- Waterproofing membrane listed to ANSI A118.10 (liquid or sheet) with its fabric for corners
- Thinset mortar suited to your tile size, margin trowel, notched trowel sized for the tile, mixing paddle and drill
- 4 ft level, laser or chalk line, a straight 1x2 ledger board, tile spacers and a leveling-clip system for large tile
- Grout, rubber grout float, sponges and buckets
- 100% silicone or other ASTM C920 sealant matching the grout, and a grout sealer if the grout calls for it
- HEPA shop vacuum and drop cloths
Step-by-step
Plan the job and check whether you need a permit
Decide how far the tile goes (I take it to the ceiling or at least well above the showerhead), pick the tile and order 10 to 15% extra for cuts. Look at the shower valve, drain and lighting: if you are only replacing the wall surface, it is tile work; if you are moving the valve, changing the drain, rebuilding the shower floor or adding a fan or light, that part is plumbing, building or electrical work.
Why: The model IRC exempts finish work such as tiling from a building permit, but moving plumbing, changing framing or adding electrical work is not finish work. Knowing which part of the job is which keeps you from tiling over work that should have been inspected first.
Code: 2024 IRC R105.2 (painting, papering, tiling and similar finish work exempt from permit) · 2024 IRC R105.1 (permit required for building, plumbing and electrical work)
Tear out to the studs and remove any paper-faced drywall
Shut off the water, protect the tub or shower pan with cardboard, and remove the old tile and wallboard down to the studs. Mist the debris instead of sweeping it dry. Pull out any regular or paper-faced 'green board' drywall inside the wet area, check the studs for rot or soft spots, and make the wall flat and plumb by shimming or sistering bowed studs.
Why: The IRC does not allow gypsum board where it is directly exposed to water, and it says water-resistant gypsum backer cannot be used where it is exposed to direct water or continuous high humidity. Inside a shower, paper-faced board gets wet behind the tile and grows mold. A flat wall also matters because tile shows every hump.
Code: 2024 IRC R702.3.5 (gypsum board not allowed where directly exposed to water) · 2024 IRC R702.3.7.1 (water-resistant gypsum backer not allowed where directly exposed to water or continuous high humidity) · OSHA 29 CFR 1926.1153(f)(1) (no dry sweeping of silica dust)
Hang a code-listed tile backer board
Use a backer the IRC lists for tub and shower walls, such as cement board, fiber-cement board or glass-mat gypsum backer, installed to the board maker's fastener spacing. Keep the bottom edge just above the tub flange or shower pan lip (never behind it), screw it with backer-board screws, and tape the seams and corners with alkali-resistant mesh tape set in thinset.
Why: The IRC lists the specific backers allowed behind tile on tub and shower walls (ASTM C1178 glass-mat gypsum, C1278 fiber-reinforced gypsum, C1288 fiber-cement and C1325 cementitious backer) and requires them to be installed to the manufacturer's instructions. Taping the seams keeps the board from cracking the tile at the joints. Running the board over the tub flange stops water that runs down the wall from wicking behind the tub.
Code: 2024 IRC R702.4.2 and Table R702.4.2 (backer materials for tub and shower walls) · ANSI A108.11 (installation of cementitious backer units)

A real job of mine: cement backer board hung on the shower walls, with a framed niche, before the waterproofing goes on. Waterproof the backer board, the corners and the niche
Coat or cover the whole wet area with a bonded waterproofing membrane listed to ANSI A118.10, following its directions for the number of coats, thickness and drying time. Reinforce every inside corner, seam, niche corner and pipe penetration with the membrane's fabric or pre-formed pieces, and lap the membrane onto the tub flange or the shower pan's membrane. Slope the bottom of a niche slightly toward the shower so water does not sit in it.
Why: Grout and most tile let water through, so the membrane is what keeps water out of the wall. The IRC requires a nonabsorbent surface at least 6 feet above the floor at a shower or a tub with a showerhead; a continuous membrane behind tile is how I make sure that surface really stays dry. If you use a gypsum backer, do not add a plastic sheet or vapor barrier behind it, because the IRC does not allow it over a Class I or II vapor retarder in a shower.
Code: 2024 IRC R327.2 (nonabsorbent surface at least 6 ft above the floor at showers and tubs with showerheads) · ANSI A118.10 (load-bearing, bonded, waterproof membranes for thin-set tile) · 2024 IRC R702.3.7 (water-resistant gypsum backer not over a Class I or II vapor retarder in a shower or tub compartment)
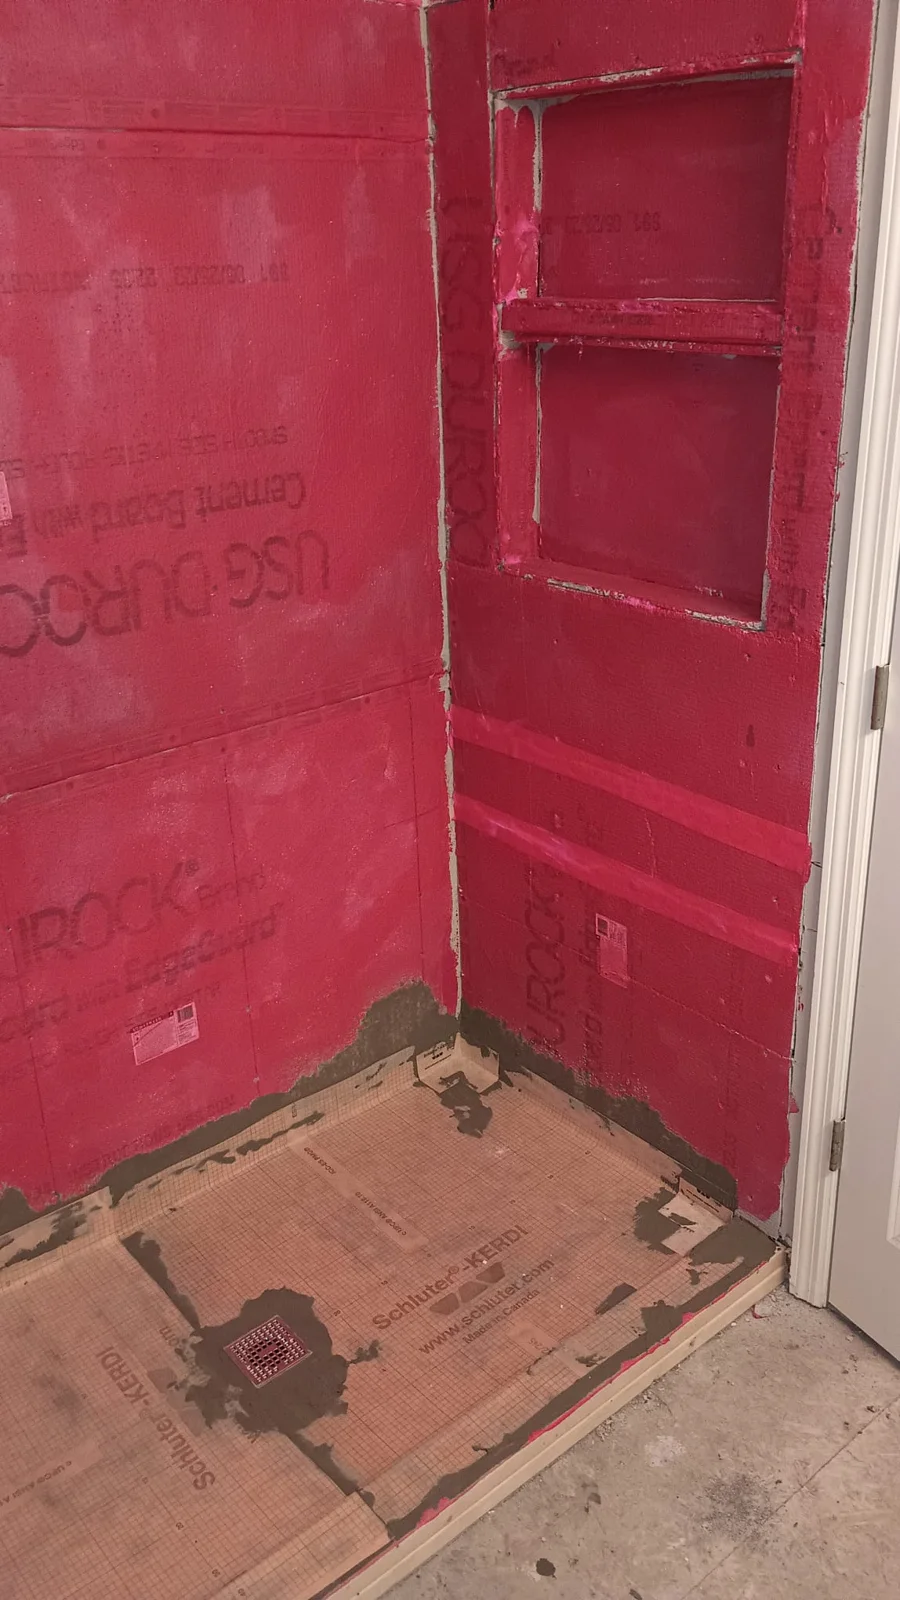
The same kind of shower after the waterproofing membrane: walls, corners and the niche all coated before any tile goes up. Lay out the tile and set a ledger board
Dry-lay a row of tile on the floor with spacers to see where the cuts land. Center the layout on the back wall so both corners get the same size cut (never a sliver under 2 inches), and plan the rows so a full tile sits at the niche and at eye level. Snap a level line one tile up from the tub and screw a straight 1x2 ledger to the wall along it; you will tile up from the ledger and fill the bottom row last.
Why: The tub is almost never level, so starting off the tub makes every row creep out of level. The IRC requires ceramic tile to be installed to the ANSI A108 and A118 standards, and a good layout is what lets you hit those standards' joint and lippage tolerances without forcing cuts.
Code: 2024 IRC R702.4.1 (ceramic tile installed per ANSI A108 and A118 standards)
Cut tile safely with water and GFCI protection
Set the wet saw up outside, fill the water tray and keep the water running on the blade for every cut. Plug it into a GFCI-protected outlet or a GFCI cord. Use a snap cutter for straight cuts on porcelain where you can, a hole saw with water for valve and showerhead holes, and score-and-snap cement board instead of cutting it with a power saw indoors.
Why: OSHA's silica rule lists a saw with a continuous water feed as the main way to control silica dust, and it limits cutting fiber-cement board with a small circular saw to outdoors with a dust collector. Homeowners are not covered by OSHA, but the dust is just as harmful. Water and electricity together are the reason the NEC requires GFCI protection on bathroom, garage and outdoor receptacles.
Code: OSHA 29 CFR 1926.1153 Table 1 (stationary masonry saw with integrated water delivery; fiber-cement board cutting) · 2023 NEC 210.8(A)(1) (GFCI protection for bathroom receptacles)
Set the tile with full mortar coverage
Mix the thinset to the maker's directions and let it slake. Comb it onto the wall with the notched trowel in straight lines, back-butter large tiles, and press each tile in with a slight slide across the ridges to collapse them. Work only an area you can tile before the mortar skins over. Every so often pull a freshly set tile to check that the back is fully covered. Use spacers, and on large tile use a leveling-clip system so the edges sit flush.
Why: ANSI A108.5 requires an average of at least 95% mortar contact for tile in showers and other wet areas (80% in dry areas), checked by pulling tiles, and it does not allow setting tile into mortar that has skinned over. Hollow spots fill with water, crack under pressure and let tiles pop loose.
Code: ANSI A108.5 (95% average mortar coverage in wet areas; no skinned-over mortar) · 2024 IRC R702.4.1 (tile installed per ANSI A108.5)

Setting large tile on a real Phoenix shower: leveling clips in every joint keep the edges flush while the thinset cures. Grout the field joints after the thinset has cured
Wait the time the thinset maker lists (usually 24 hours) before you grout. Pull the spacers and leveling clips, clean any mortar out of the joints, then pack grout diagonally across the tile with a rubber float. Leave the inside corners and the joint at the tub empty. Clean the haze with a barely damp sponge, rinsing it often.
Why: Grouting too soon can trap moisture and pull tiles out of plane. ANSI A108.10 covers how grout is installed in tilework, and the TCNA movement-joint guideline says the inside corners of a shower get a flexible sealant, not grout, so they must stay clean of grout and mortar.
Code: ANSI A108.10 (installation of grout in tilework) · TCNA Handbook EJ171 (movement joints)
Seal the corners and the tub joint with flexible sealant
After the grout is dry, run a bead of 100% silicone or another ASTM C920 sealant (colored to match the grout) in every inside corner, along the tub or shower pan, and around the valve trim and spout. Tool it smooth. Seal the grout with a penetrating sealer if the grout type calls for it.
Why: Walls and the tub move a little with heat, weight and Phoenix's big temperature swings, and rigid grout in a corner cracks and lets water in. The TCNA guideline calls for interior movement joints at all inside corners (never narrower than 1/8 inch), and ANSI A108.02 says movement joints must be kept free of setting materials and sealed after the tile and grout are dry.
Code: TCNA Handbook EJ171 (movement joints at all interior changes of plane) · ANSI A108.02 4.4.3 and 4.4.5 (keep movement joints clear; install sealant after tile and grout are dry)

The finished shower: wall tile grouted, the niche trimmed out and the corners sealed. Ventilate, let it cure and clean up without dust
Run the bathroom exhaust fan (or open the window) while the materials cure, and keep the shower dry for the time the grout and sealant makers list, usually 24 to 72 hours. Clean up cuttings and dust with a HEPA vacuum or damp wipes, not a broom. If you install a glass shower door or there is a window in the wet area, make sure it is safety glass.
Why: The IRC requires a bathroom to have an openable window or an exhaust fan vented to the outdoors, which also helps grout and sealant cure and keeps the new shower from growing mildew. Glass within 60 inches of the walking surface at a tub or shower is a hazardous location that needs safety glazing.
Code: 2024 IRC R325.2 (bathroom window or exhaust fan vented outdoors) · 2024 IRC R324.4.5 (glazing near tubs and showers is a hazardous location) · OSHA 29 CFR 1926.1153(f)(1) (no dry sweeping of silica dust)
When to stop and call a licensed pro
- You find soft, rotted or moldy studs or subfloor when the old tile comes off.
- The shower valve, drain or showerhead has to move, or the shower floor or pan has to be rebuilt.
- You want to add or move an exhaust fan, light or outlet in the bathroom.
- The tile is large-format, natural stone or glass, which needs flatter walls and different setting materials.
- The tub or shower already leaked into the wall or a ceiling below.
- You need the shower back in service in a few days instead of a few weekends.
Common questions
Do I need a permit to tile a shower in Phoenix?
The model 2024 IRC lists tiling as finish work exempt from a building permit (Section R105.2). Moving the valve or drain, rebuilding the shower floor, changing framing or adding electrical work is different and normally needs a permit. Phoenix and other Valley cities write their own administrative rules, so confirm with your building department before you start.
Can I tile directly over drywall or green board in a shower?
No. The IRC does not allow regular gypsum board where it is directly exposed to water, and it does not allow water-resistant gypsum (green board) where it is exposed to direct water or continuous high humidity. Use one of the backers the IRC lists for tub and shower walls, such as cement board, and waterproof it.
Is grout waterproof?
No. Cement grout lets water through even when it is sealed. Sealer slows staining, but the waterproofing membrane behind the tile is what keeps the wall dry.
How high should the tile go in a shower?
The IRC requires a nonabsorbent surface at least 6 feet above the floor at showers and at tubs with showerheads (Section R327.2). I usually take the tile and waterproofing to the ceiling or well above the showerhead.
Should I use grout or caulk in the shower corners?
Use a flexible sealant such as 100% silicone in the inside corners and at the tub or pan. The TCNA movement-joint guideline calls for movement joints at all inside corners, because grout there cracks as the walls move.
Want it done right the first time?
I tile showers, tub surrounds, backsplashes and floors across Phoenix, including the backer board and waterproofing behind the tile. See my Shower and tub surround tile in Phoenix, or send a request with the contact form and text me a photo for a fast estimate.
Licensed Phoenix, Arizona General Contractor ROC 367058 (R-62)